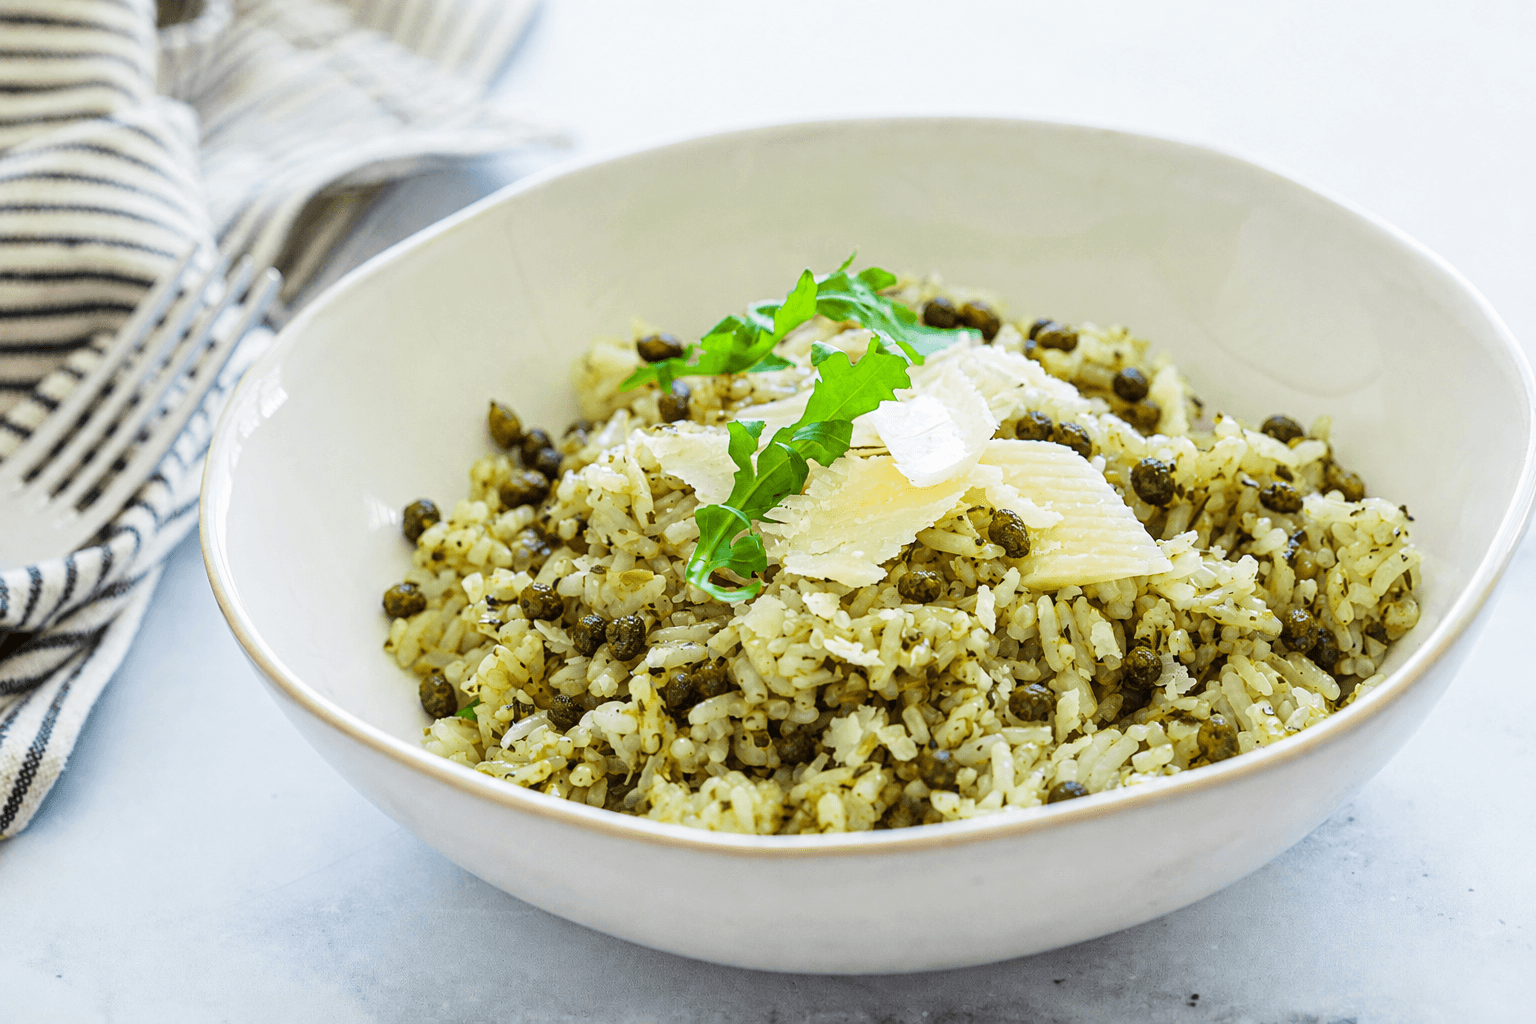
Brown Butter Risotto with Silken Garden Green and Crispy Capers
Nutty brown butter, a blend applied twice, and crispy capers that crack with every bite.
A slow-stirred risotto built on brown butter and a split-phase application of Silken Garden Green Blend. The blend goes in twice: once at the start, where its coriander (grounding) and celery leaf (umami) settle into every grain during the 20-minute cook, and once off the heat, where its fresh herbs stay bright. Crispy fried capers finish the plate with salt and crunch.
Ingredients, method, and practical notes
Equipment
Method
Pour the chicken stock into a medium saucepan and warm over medium-low heat until gentle wisps of steam rise from the surface and small bubbles break at the edges. Reduce heat to low and hold there for the entire cooking time.
👁 Steam rising gently, small bubbles breaking around the edge of the pan. No rolling boil.WhyCold stock added to hot rice cools the pot with every ladle and stretches cook time past the window where the first teaspoon of blend stays expressive. Hot stock preserves the rhythm of the cook.If something's offThe stock is at a rolling boil by the time you need it.Fix: Too much heat. Pull off the burner briefly and reduce to low. You only need it warm, not actively cooking.
Spread the drained capers on a clean kitchen towel and press gently until they look and feel fully dry. Heat the neutral oil in a small skillet over medium-high heat until the oil shimmers and a single caper dropped in sizzles vigorously. Add the rest of the capers and fry for 2 to 3 minutes, stirring once, until they burst open and turn crisp and slightly browned. Transfer to a paper-towel-lined plate with a slotted spoon. Set aside.
👁 The capers bloom open like tiny flowers, go from dark green to olive-green, and feel crisp when tapped with a spoon.WhyCapers are about 80 percent water by weight. Any residual moisture on the surface will drop the oil temperature and turn the fry into a steam, producing soft, soggy capers instead of crisp, shattered ones.What to noticeThe oil should sizzle audibly when the first caper lands. If it pops violently and oil jumps out of the pan, the capers were still too wet. Stand back and reduce heat slightly.If something's offAfter 3 minutes the capers are still dark and pliable rather than blond and crisp.Fix: Either the oil was not hot enough or the capers were too wet. Remove them, heat the oil another minute, pat the capers drier, and try again.
Melt 4 tablespoons of the butter in a heavy-bottomed 3 to 4 quart pot over medium heat. Swirl the pan occasionally. The butter will foam, then subside, and the milk solids will begin to turn golden at the bottom of the pan. Continue cooking for 4 to 5 minutes total, watching closely, until the milk solids are deep golden-brown and the aroma is distinctly nutty.
👁 A layer of dark golden-brown flecks at the bottom of the pan. The butter itself is clear amber. The smell shifts from dairy to roasted nuts.Bloom PhaseWhyThe brown butter is the foundation of this risotto's flavor. Without sufficient browning, the finished dish will taste like plain butter risotto with herbs on top rather than a deeply nutty, integrated whole.What to noticeThere is about a 30-second window between perfectly browned and burnt. Once you smell the nutty aroma, move to the next step quickly.If something's offBlack specks at the bottom of the pan and a harsh, acrid smell.Fix: The butter went past brown to burnt. There is no recovery. Wipe the pan clean and start over with fresh butter at medium-low heat next time.
Reduce heat to medium-low. Add the diced shallots and a small pinch of salt. Cook, stirring frequently, for 3 to 4 minutes until the shallots are translucent and soft but not browned.
👁 Shallots go from opaque white to translucent. They glisten in the butter without picking up color at the edges.Bloom PhaseWhyThe shallots need to be soft enough to disappear into the final dish. If they brown, they take on a sweetness that will compete with the blend's herb structure.Add 1 teaspoon of Silken Garden Green Blend to the shallots and stir continuously for 30 seconds until the butter turns pale green and smells herbal.
👁 The butter goes from amber-brown to a soft green-gold. The aroma shifts from nutty butter to nutty butter with a distinct herb top note.Bloom PhaseWhyThis is where coriander and celery leaf open in the fat and become part of the cooking medium rather than a sprinkled seasoning. Every grain of rice added after this point will pick up the herb character from the inside.What to noticeWatch for the color shift in the butter. If you miss it, the blend is still warming through rather than blooming. Give it another 15 seconds.Add the arborio rice to the pot. Stir to coat every grain in the bloomed butter. Toast the rice for 2 minutes, stirring continuously, until the edges of the grains turn translucent while the centers remain opaque white.
👁 Each grain has a translucent outer ring around a white center, like a soft eye. The pot smells faintly of toasted grain underneath the herbs.Bloom PhaseWhyToasting the rice in fat before any liquid hits it creates a protective starch shell that releases creaminess slowly and evenly over the long cook, rather than dumping it all at once and producing mush.If something's offThe rice starts to brown or pop.Fix: Heat was too high. Reduce to medium-low and keep stirring. The grains should sizzle softly, not pop.
Pour the white wine into the pot. Stir and let it bubble steadily for 1 to 2 minutes until the liquid has mostly absorbed and the pan looks nearly dry when you draw a spoon across the bottom.
👁 The spoon leaves a clear track across the bottom of the pan that fills in slowly. The sharp wine smell has cooked off and been replaced by a mellower aroma.Cook-In PhaseWhyAdding the wine before the stock lets its acidity and aromatic lift bind to the starch at the earliest moment, before volume liquid dilutes its impact.Add about 3/4 cup of the warm stock to the pot. Stir frequently but not constantly. When the liquid has mostly absorbed and you can draw a clear track with the spoon, add another 3/4 cup. Continue in this pattern for 18 to 20 minutes total, adjusting heat to maintain an active simmer. The last addition should be smaller (about 1/2 cup) so you can judge the final texture.
👁 Each new ladle of stock should bubble immediately on contact. The pot maintains a steady, even simmer, not a roiling boil. The rice gradually becomes creamy and suspended in a loose sauce.Cook-In PhaseWhyGradual stock additions force the rice to release its starch slowly and evenly. Dumping all the stock in at once produces boiled rice in broth, which is not the same dish. Frequent but not constant stirring encourages starch release without beating the grains into paste.What to noticeAround the halfway point (ladle 3 or 4 of 6), taste a grain. It should already taste seasoned from the inside, not just starchy and salty. That is the first teaspoon of blend doing its work.If something's offThe rice is still hard and chalky at the 20-minute mark despite the stock being absorbed.Fix: The simmer was too low. The liquid was absorbing by cooling and soaking rather than active cooking. Raise heat slightly, add another small splash of stock, and continue.
Test the rice. It should be tender with a slight firm bite at the very center of each grain, and the risotto as a whole should flow like a slow wave when you shake the pan gently. If it looks rigid and glued together, stir in another splash of stock. If it looks soupy, cook another minute.
👁 When you pull the spoon across the pan and release, the risotto settles back in a slow, gentle wave. The surface smooths itself within a second or two.Cook-In PhaseWhyRisotto continues to absorb liquid on the plate. If it looks perfect in the pan, it will look glued on the plate by the time it reaches the table. Pull it slightly looser than you want to eat it.Remove the pot from the heat completely. Add the remaining 2 tablespoons of cold butter, the grated parmigiano, the remaining 1 teaspoon of Silken Garden Green Blend, and the lemon zest. Stir vigorously for 30 to 60 seconds until the risotto becomes glossy and creamy and every ingredient is incorporated.
👁 The risotto looks visibly creamier and shinier than before. The surface has a satiny gloss. The herb aroma lifts immediately as the second teaspoon of blend hits the warm rice.Finish PhaseWhyOff the heat is non-negotiable for this step. The second teaspoon of blend is doing a different job than the first. Its fresh herbs (basil, dill, mint, parsley) are heat-sensitive and will lose their top notes within seconds on direct heat. Cold butter beaten in off-heat creates the signature glossy, creamy finish without breaking into oil.What to noticeThe moment the cold butter hits the warm rice, the risotto looks different. Creamier, rounder, more unified. That visual shift is the finish completing.If something's offThe butter melts into a pool of oil and sits on the surface instead of binding into the rice.Fix: The risotto was too hot or not stirred vigorously enough. Next time, let the pot sit off heat for 30 seconds before adding the cold butter, and stir like you mean it.
Cover the pot and let the risotto rest for 2 minutes.
👁 When you lift the lid, the herb aroma comes up stronger than it did right off the heat.Rest PhaseWhyThe rest lets the second teaspoon of blend finish settling into the dish. What was subtle at minute zero off heat becomes present and integrated at minute two.What to noticeCompare a spoonful tasted right after the finish to a spoonful after the 2-minute rest. The rested version is rounder and more composed. The herbs have spread through rather than sitting on top.Taste and adjust seasoning with salt only if needed. Spoon the risotto into warmed shallow bowls. Top each serving with a generous scatter of the crispy capers, torn parsley leaves, shaved parmigiano, a small squeeze of lemon juice, and a fresh crack of black pepper. Serve immediately.
👁 Each bowl is creamy and pale green-gold, with crispy capers and herb leaves visible on top. The lemon squeeze makes the rice fragrant in one final wave.Finish PhaseWhyWarming the bowls keeps the risotto at its intended texture from first spoon to last. A cold bowl pulls heat from the rice and tightens it into a denser mass. Plating elements all go on at serving so their textures stay crisp.
What This Recipe Teaches
How the same blend does different work when introduced at different phases of the same cook. One teaspoon bloomed in hot fat becomes structural, distributed through every grain by the cooking liquid. A second teaspoon added off heat stays bright and aromatic because its fresh herbs never meet direct heat. Same blend, two jobs, one dish.
How the Blend Behaves Here
The blend does two different jobs in the same dish. The first teaspoon blooms in brown butter alongside the shallots. Its coriander (a grounding agent) and celery leaf (an umami agent) open in the fat and become structural, working through every grain of rice during the 20-minute cook. The second teaspoon goes in off the heat at the finish, with cold butter and parmigiano. Its fresh herbs (parsley, basil, dill, mint) stay vibrant because they never meet direct heat. You end up with the blend in two registers: a warm, integrated savory layer from the bloom and a bright, herbal layer from the finish.
What to Notice
Aromatic entry: Nutty brown butter, lifted by a green herb note that comes up as you bring the spoon to your mouth. A trace of lemon zest at the rim of the bowl.
Mid-palate: Creamy, al dente rice carrying a full, integrated herb and savory character. The risotto tastes composed, as if it were made with a dozen ingredients rather than three. Gentle warmth from the ginger and white pepper in the blend, nothing sharp.
Lingering finish: Herbal green, the dry salinity of parmigiano, a crispy caper every few bites that delivers a salt and vinegar punctuation and resets the palate for the next bite.
Single Application vs. Split Application
Why splitting the blend between bloom and finish produces a different dish than using it all at the start.
How: Make the recipe twice with the same total amount of blend (2 teaspoons). The first time, add all 2 teaspoons at the bloom and skip the finish teaspoon. The second time, follow the recipe as written with 1 teaspoon at the bloom and 1 teaspoon at the finish. Taste both side by side.
Compare: The single-application version will taste composed and integrated but quieter. The split-application version has noticeably more herb presence in the aroma and the first bite, because the finish teaspoon never loses its volatile top notes to heat. This is a direct lesson in how heat modifies herb character and why some ingredients belong at more than one phase of the same cook.
Symptom: The risotto tastes flat despite using the full amount of blend
Cause: The stock was added cold or not kept hot enough. Each ladle cooled the pot and slowed starch release, stretching cook time past the window where the first bloom of the blend stays expressive.
Fix: Keep the stock at a bare simmer next to the risotto pot for the entire cook. Never add cold stock. If you run out of warm stock, top up the saucepan with fresh liquid before the next addition.
Symptom: The herb flavor disappears by the time the risotto reaches the table
Cause: The second teaspoon of blend was added while the pot was still on heat. The fresh herbs in the blend (basil, dill, mint) lost their volatile top notes within seconds on direct heat.
Fix: Pull the pot off the burner completely before adding the second teaspoon, the cold butter, the cheese, and the lemon zest. The finish is a rest-phase action, not a cooking step.
Symptom: The capers are soft and greasy rather than crisp
Cause: The capers went into the oil with surface moisture still on them. Water turned the fry into a steam.
Fix: Spread the drained capers on a clean towel and press gently until they feel fully dry to the touch. The oil should sizzle audibly but not pop violently when the first caper lands.
Symptom: The risotto seizes into a tight, sticky mass on the plate
Cause: The pot came off the heat too dry. Risotto continues to absorb liquid during the rest and on the plate. If it looks perfect in the pan, it will look glued by the time it reaches the table.
Fix: Pull the risotto when it still moves like a slow wave in the pan. If you are uncertain, stir in one last splash of warm stock before the off-heat finish. Looser in the pan, perfect on the plate.
Notes
Keeping It Vegetarian
Unsalted vegetable stock works well and does not read as a compromise here. The risotto is built on brown butter rather than a meat base, so the swap holds up. Avoid beef stock, which will compete with the brown butter and muddy the herb character.
Why the Pot Matters
A heavy-bottomed 3 to 4 quart pot (enameled cast iron or thick-based stainless) is essential. Thin pots scorch brown butter before the milk solids fully develop and cook rice unevenly during the long simmer. The goal is gentle, even heat that you can raise and lower quickly.
The Wave Test
Near the end of the cook, shake the pan gently. The risotto should move in a slow, gentle wave that settles within a second or two. If it sits rigid, add a splash of stock. If it sloshes like soup, cook another minute. This is more reliable than a timer for knowing when risotto is done.
Cooking for Six or Eight
This recipe doubles well. One adjustment: brown the butter in a separate small pan first, then pour it into the larger risotto pot. Browning butter in a wide pot makes the color change hard to see, and the window between browned and burnt closes fast.
What You Can Do in Advance
Risotto is not a true make-ahead dish, but several components can be prepped up to a day ahead. Fry the capers and store them in an airtight container at room temperature. Dice the shallot and refrigerate. Brown the butter, refrigerate in a small jar, and re-melt gently when needed. These steps cut active cooking time to about 25 minutes.
More recipes like this
New recipes and seasonal cooking ideas, once a week. Never more.
See everything that's in the newsletter